Showing posts with label healthy. Show all posts

Wednesday, 8 October 2025

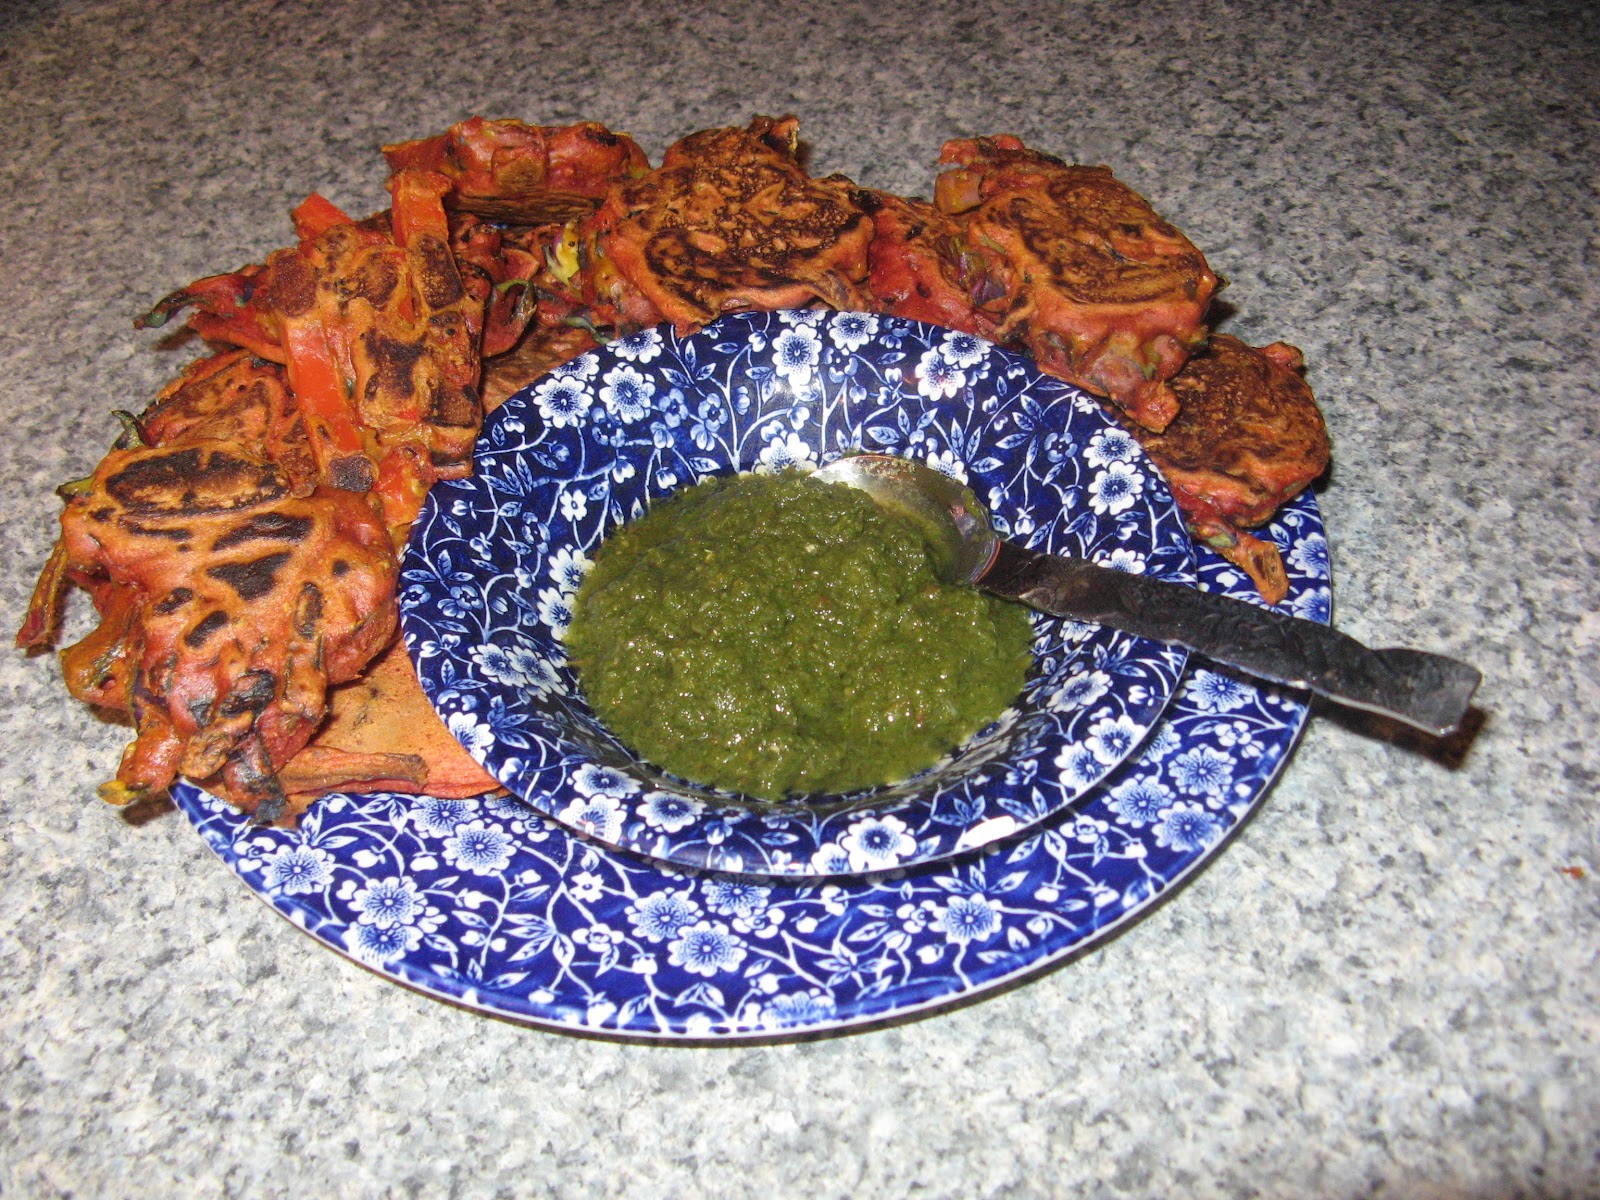
An Unusual Mint Chutney


It's true.  My mint chutney looks nothing like a reasonable mint chutney, green, a little textured and chunky, or sometimes a smooth liquid.  But it has a bright, fresh taste that livens up my little samosas.

I make this in a small quantity, just enough for our humble repast of beef samosas from a Halal grocery, along with some raw vegetables.  The frozen samosas take 20 minutes in the air fryer, so this is a lazy, quick dinner around here. 


I used to use too many mint leaves, and the mix came out tasting like minty velcro.  Mint has a slightly furry texture.  I know, I know, adding red pepper messes with the colour, but the plums replace the usual bit of jaggery with something bright and fresh. Every spring I pick up a healthy bundle of mint, gather the healthiest tips and root them in vermiculite and lightly fertilized water, then plant in a partially sunny spot.


Ingredients 

1/3 of a fresh sweet red pepper, finely diced

1/3 of a small, red onion, finely diced

1 small green chili, , maybe less, depending on taste, diced

8 - 10 fresh mint leaves, cut into strips


2 small sweet plums, pitted and diced

a single slice of ginger root, thinly sliced

1 small garlic clove, chopped

slightly less than a fresh, half lime's juice

salt, pepper to taste


Method

Put all ingredients into a deep container, put in your buzzer, hold your free hand over the container to limit splash back and buzz.  Lift and look and buzz some more till you get to your preferred texture. 


This object is sometimes called a "buzzer" or a "hand held blender."  They come in very handy for fresh chutneys, salad dressings, and salsas.  Don't get me started on the salsas! 


Note:  I loathe the deep fried samosas, so I rely on these little guys.  Only yesterday I chose a deep fried samosa at a snacking counter, and immediately regretted it.  These are much healthier.  Look ma!  No heart attack!


Here we have a simple, super quick, healthy but humble repast. 


Monday, 11 November 2024

Chicken and Apricots with Freekeh

Chicken and Apricots with Freekeh

 I'll tell this story quickly.  I'd been watching a TV cook make a salad he swore would be high fibre, and to guarantee that, he added couscous.  What?  Couscous is a pasta made from white flour.  He should'a added cooked cracked wheat, or bulgur.

So with great indignance I went to the grocery store to buy bulgur, to show him a thing or two.  But no bulgur.  Instead I found freekeh.  Huh?  I googled it and thought, okay. 

Freekeh is a green durum wheat that has been roasted and smoked, and it's better than bulgur!  In fact, delicious!

So that launched me onto this! 

Ingredients

The marinade:

4 cloves fresh garlic, chopped 

one inch fresh ginger, chopped

3 whole cloves

3 whole allspice

1 two inch red chili

1 teaspoon whole cumin

1 teaspoon whole coriander

1/2 teaspoon ground cinnamon

1/8 whole nutmeg

1/2 teaspoon salt    

Grind the spices to a powder.

The main ingredients

6 to 8 thicken thighs, with skin and bone

1 cup freekeh

1 cup cold water plus 1 1/2 cup water or chicken or vegetable stock

1 1/2 tablespoons olive oil

1/2 red onion, diced

1/4 large red cabbage, diced

12 dried apricots, sliced into 1/4 inch strips

1 sweet red pepper, diced

1/2 cup walnuts, chopped 

Bag of Freekeh
Freekeh, look for it in the International Aisle


Method

Grind the spices to a powder.

Add chopped garlic and ginger to a lidded container that you use to marinate the chicken.

Take half your spice and salt mixture and stir into the garlic and ginger in the lidded container.  Add chicken and rub the spice mix into each piece, then put the lid on and refrigerate for between three and 24 hours. 


Before you're ready to cook, add freekeh and cup of water to a small bowl, so it has 15 minutes to soak. Load the chicken into your air-fryer.  Why? The high heat of the air-fryer will drain much of the chicken fat away.  Set the device at 400 F and 25 minutes.  You will probably need to use a rack, depending how big it is.  Keep that marinating container with bits of garlic, ginger and spices handy. 

While the chicken is cooking, pour the olive oil into a large, deep pan that had a lid.  With heat on at medium high, add onions. Cook, stirring frequently till caramelization starts.  Then add cabbage.  Let caramelize a little, then add remainder of the ground spices.  Drain and rinse the freekeh and add to onion and cabbage.  Add your 1 1/2 cups of water or stock to that container you used to marinate the chicken.  There will still be bits of garlic, ginger and spice, so mix well and then add to the large pan. 

When the air-fryer bings, add the chicken to the vegetables and freekeh.  Add the apricots, stir, put the lid on, bring to a boil then lower heat to medium low.  Stir occasionally

Cook for about 30 minutes.  In the last five or ten minutes, add the red pepper.  Once cooked, stir in the walnuts.

Normally I would plate this on a beautiful platter or large bowl, but we were off to a community potluck, and my container was a big plastic tub. (Not gorgeous)


As the cabbage cooks, it loses its beauty, which is why you need the red pepper and apricots!  I added all 6 pieces of chicken but clicked at this point,


Friday, 22 July 2016

Minted Watermelon Salad

Minted Watermelon Salad

This salad is a bit sweet and very refreshing.  Watermelon replaces the cucumber that usually fills this recipe. A touch of fennel seed adds an interesting dimension.  This is more of a savory salad than a fruit salad, because of the onion.

It should take less than twenty minutes to make this salad, depending on your chopping skills, and it serves four when served as a side dish.

¼ red onion
1 sweet long red or orange pepper
1 round slice of watermelon
1 tomato
10 or so fresh mint leaves
5 springs of cilantro, stems removed
¼ teaspoon fennel seed
5 to 10 grates of black pepper
¼ teaspoon garam masala (optional)
½ lime, juiced


The only secret to this salad is finely dicing all the fresh ingredients into the same size cubes.  Little cubes, about ¼ inch across.  You can make the onion a squinch smaller, if you prefer.  The mint leaves can be julienned.


Grate as much pepper as you like, but do include some!  Add the fennel seed and lime juice.  I don’t add any other spice to this, as I like it as a fresh contrast to spicy food.  No garam masala or chat spice for me in this recipe!  Toss and serve.  So clean and tasty!

Just be sure to dice all the ingredients into the same size.  Pretty and delicious!

Sunday, 21 June 2015

Kala Channa Masala

Kala Channa Masala

My life might be easier if I owned a pressure cooker.  But when I read horrifying descriptions of the disasters involved with them, I just plan well ahead.  If you own a pressure cooker, you can make this dish much more quickly than I can manage.

Kala channa isn’t the usual chick pea we see in cans.  It’s a different variety, and I’m told it’s higher in nutrients, especially iron.  Its flavour is a little different than the usual channa, and it’s a bit more heavily textured.  So far, I’ve seen the pea available only in the dried form, but I’m happy to put in the time required for this dish.  Plan to make this two days ahead of eating, if you use a slow cooker.  You don’t need to be chopping and stirring for the entire time; you just need to get started early.  This recipe makes a big pot of channa masala.

4 cups dried kala channa beans
Water to cover and leave lots of room

1 tablespoon cumin seed
½ teaspoon black ajwain
1 teaspoon black peppercorns
1 teaspoon fenugreek seed
3 black cardamom pods
Cool roasted spices before buzzing.
5 cloves
1 dried Kashmiri chili
1 tablespoon coriander seed
2 large sticks cassia or cinnamon
1 teaspoon turmeric powder
½ teaspoon amchur powder 

2 tablespoons mustard oil
½ teaspoon cumin seed
½ teaspoon mustard seed
1 large red onion, diced 

3 large fresh tomatoes
8 cloves garlic
2 inches ginger
2 Serrano peppers

1 bunch fresh cilantro
Water for blender
1 teaspoon salt, possibly more
2 tablespoons jaggery powder, or to taste
2 to 3 tablespoons heavy cream, or to taste

Two days ahead of serving, soak the kala channa overnight in water.  Be sure to not just cover the channa, but leave another two inches of water for headroom.  These beans will swell up somewhat.  The next morning, drain and rinse.

In a slow cooker, add the channa and lots of water, again, leave at least two inches of headroom, possibly more.  The beans won’t swell much more, but the beans need to be left for 24 hours worth of cooking on ‘high’ heat (a slow cooker isn’t very hot).  You will need a lot of water for this duration of time.  After they’ve cooked for about 24 hours, turn off the heat and let rest till you’re about to cook these up.  I’ve frozen surplus cooked beans before, so I have them ready when I need them.

About three hours before you need to serve these, dry roast your dry whole spices.  In a heavy and large saucepan, place all the spices except the turmeric and amchur.  Put on medium high heat, and jiggle the pan while you’re watching the progress.  A little smoke and nice fragrance is all you need, then brush them into a spice grinder, along with the turmeric and amchur.  No need to buzz just yet.  Set aside to cool. 
Slice this way, then cross ways for fast dicing.

Meanwhile, add the mustard oil to that saucepan.  Turn heat onto medium high, and when oil is hot add extra cumin seed, then mustard seed.  These will splutter and pop a bit, so within moments, add the onion and stir.  Reduce heat to medium.  Cook till onion is transparent and partially caramelized. 

While the onion is cooking, toss the tomato, garlic, ginger and peppers into a blender.  Buzz to a smooth liquid.  Set aside.  Buzz the spices to a fine powder, and add to the cooking onion.  You may need to add additional oil so the spices can cook more easily.  Stir and cook for a few minutes.  

Have the saucepan lid handy.  Quickly add the buzzed tomato mixture and cover.  Set the blender aside to fill with more water and cilantro for later.  (No use letting those good garlic and chilli flavours get washed away.) 

Cook the tomato and onion mixture till it’s no longer boiling and spitting furiously.  Once it's safe, open the pot and add the cooked channa.  Add more blender water at this point, if needed.  Cook for another hour and a half or so.  Put the fresh cilantro, stems and all, into the blender and add enough water to buzz it into a green liquid.  Add that to the channa.  Add more water if the mix is too thick.

Continue to cook on medium high heat.  In the last half hour of cooking, add salt to taste.  Add jaggery if needed.  (I found my masala tasted quite sharp, so I needed the jaggery.)  Add cream a few minutes before serving.  Adjust for salt, jaggery and cream flavours, then serve with rice or chapattis.  (I served with both!)  

This recipe makes a fabulous main course, when paired with either rice or whole wheat chapattis, and also makes a great side dish to go with butter chicken, kerela and sag paneer. 


I’m happy to plan ahead, but I wonder, should I bite the bullet and buy myself a pressure cooker? What do you think?  Please drop me a line. 

With butter chicken, kerela, sag paneer and basmati rice.  Chapatties were all eaten by clicking time.

Tuesday, 11 November 2014

Ginger, Date and Walnut Whole Grain Muffins

Ginger, Date and Walnut Whole Grain Muffins

The frosty winter is upon us, and so we crave sweet carbs.  One way to slow down your carb consumption is to make the goodie textured, so textured you are obliged to chew for a while.  Adding protein also helps.  Also the more complex and warming the flavours, the better they satisfy.

These muffins are sweet, gooey, spicy, salty(ish) and very grainy, and filled with protein. Everything you want when you’re experiencing those cravings.

This recipe makes two dozen, and is ready to eat in about one and a half hours, including cooling time. Preheat your oven to 425 Fahrenheit.

1 cup pitted dates
3/4 cup water
30 or so scrapes of peeled ginger ( potato peeler will do)
1 tablespoon white sugar

2 cups whole wheat flour
1 ½ cups porridge oats (contain oats, flaxseed, wheat germ and oat germ) You can use plain oats if you want less chewiness.
¾ teaspoon coarse salt
2 tablespoons jaggery powder (raw Indian sugar or brown sugar)
1 heaping teaspoon cinnamon powder
1 heaping teaspoon dried ginger powder (more if you love heat)
1 cup chopped walnuts

1 and 7/8th cups plain yogurt (nearly 2 cups)
1 egg
2 tablespoons vegetable oil (or ghee, which is clarified butter available on Indian grocery shelves)
½ cup molasses

Ginger is translucent and sticky when ready.
Combine dates, water and strips of ginger in a pot and set on medium high.  The idea here is to soften the dates and let the water evaporate till about a quarter of a cup is left.  Meanwhile, get to work on the muffin batter.

In a medium size bowl, combine dry ingredients with a fork.  Add walnuts and combine.  Set aside.

In a second medium size bowl, add the yogurt.  You want almost two cups worth, but not quite. Remove the dates from the pot, and gently pull apart.  Set aside.  Add sugar to the ginger and water, and set to boil. 

Make more candied ginger and go hog wild, unlike me!
When the syrup from the ginger pieces has reduced to about a tablespoon, add it to the yogurt to bring the measure up to two cups. Plop those date pieces into the batter.  Coming across these gooey lovelies makes eating these delightful.

Stir the date pieces and syrup into the yogurt, then stir the egg into the yogurt.  You can use vegetable oil or ghee, but I used ghee.  (The devil made me do it.) Pour oil or ghee into a measuring cup, coating halfway up the sides of the cup, then add that to the yogurt.  Pour the molasses into that cup then into the yogurt.  (An oily cup releases the molasses easily.)  Pour the wet mixture into the dry mixture.  Gently stir till ingredients are combined.

Recipe adapted from my 1971 New York Times cookbook.
Spoon the batter into paper lined muffin tins.  Place a strip of candied ginger on top of each muffin.  Some lucky muffins get more than one, but don’t go hog wild if you’re thinking of calories. 

Bake about twenty minutes, or till a toothpick comes out clean.  Cool off a bit on racks and enjoy while still warm.

These are nowhere near as sweet or greasy as store-bought muffins, but they are lovely indeed. Fragrant, chewy, sweet in spots, oh my.  Please try them and let me know how they turned out!

Breakfast never tasted so good.


Sunday, 4 March 2012

Curry Leaf Asparagus


Curry Leaf Asparagus--really easy!
Curry Leaf Asparagus 
Today in the supermarket we saw a lady march past with her cart heaped with pounds and pounds of asparagus.  We stopped wondering when we turned the corner and saw the asparagus on sale, looking fresh and wonderful, and this is the result.  Now I’m regretting we didn’t buy as much as she did!

1 tablespoon mustard oil
1 teaspoon dark mustard seed
1 teaspoon cumin seed
1/3 red onion, sliced thinly and long pieces chopped
2 large fresh garlic cloves, chopped
10 curry leaves (I buy this fresh in an Indian grocery store, and I put it in a freezer bag and freeze it.)
1 Anaheim pepper, diced
¼  inch fresh ginger, chopped
1 bunch asparagus, cleaned with bottoms removed
1 teaspoon freshly squeezed lemon juice
salt to taste
Put the pan on medium high heat and when it's hot, add the oil.  When the oil seems hot, toss in a few mustard seeds, and if they sizzle and turn white, add the rest of the mustard seeds.  Add the cumin seeds, and then the onion and ginger.  Stir to cool it down, and turn the heat down to medium.  After the onions have caramelised a bit, add the garlic and curry leaves and cook for a few more minutes.  Add the chopped pepper and asparagus, stir and cover.  Continue to cook for about seven to ten minutes, stirring from time to time.  They are done while they’re still a pretty green, and somewhat soft, but still a little tender.  Just before serving, add the lemon juice and stir to coat the asparagus.  Oh boy, spring has almost sprung!

Monday, 27 February 2012

Raita (Flavoured savoury yogurt)


Raita and gobi parathas make a nice lunch!
Raita  (Flavoured savoury yogurt)
Luckily this is very easy and simple to prepare, full of calcium, protein and your best probiotic friends!

½ cup plain yogurt (I use homemade. Find the recipe here.)
1 tiny fresh garlic clove, smashed and chopped to a paste
4 stalks fresh cilantro
dusting of nigella seed, or perhaps paprika, or perhaps both
Raita is often used as an accompaniment to cool down an otherwise spicy hot dish.  The properties of the yogurt sooth a seared tongue.  For a big party, I’ll make several raitas to accompany the meal, each with different spices such as cumin, mint leaves, chilli flakes, or black pepper.  One time I made a raita with lots of fresh green chilli and cilantro, and my poor sister who needed a fast mouthful of raita to cool her mouth, grabbed the chilli raita by mistake.  She later claimed that she had to lay in my bathtub, with her mouth under the faucet.  A slight exaggeration, I’m sure. 

At least half an hour before serving, mix the yogurt, garlic paste and chopped cilantro.  Put in a pretty bowl, and sprinkle with nigella seed, and perhaps some paprika.  This makes a lovely accompaniment to any meal, but can also serve as the protein in a light lunch when served with chapattis or my recipe for gobi paratha.

Tuesday, 14 February 2012

Bright and Lively Cilantro and Mint Chutney


Cilantro and mint chutney with pakoras
Bright and lively Cilantro and mint chutney
This fresh chutney recipe is so healthy and it’s easy to make with a blender!

1 large tomato, roughly chopped
1 lime, seeded and juiced
2 cups fresh, washed cilantro leaves and stems
½ cup fresh washed mint leaves
4 green chillies
1 small fresh garlic clove
½ inch fresh ginger, roughly chopped
salt to taste

Add lime juice and tomato to blender and buzz till blended.  Add the chillies, garlic and ginger and buzz till well blended.  Add the mint and half the cilantro and buzz.  Add the rest of the cilantro and buzz. The last bit doesn’t have to be perfectly blended in.  A little texture is nice.  Pour into a pretty bowl with serving spoons.  This recipe for a bright and lively chutney will make an excellent accompaniment for pakoras.

Saturday, 11 February 2012

Cardamom Bliss Peach Crumble


Cardamom Bliss Peach Crumble
 Cardamom Bliss Peach Crumble with pure edible silver
We’re off to visit our friends to meet their granddaughter this afternoon, and they are  ‘gluten aware’.  There is some argument over the gluten levels in oatmeal, as some brands have less levels than others. If you are gluten aware, or intolerant, you’ve probably done your research into oatmeal, and know which brands to buy.  Regardless of gluten, this recipe for cardamom bliss peach crumble is so divine, you won’t care about such earthly matters.

4 cups peaches, cut into pieces  (I buy a case of ripe orchard peaches every summer, and freeze them with a little sugar and vitamin C.  They are spectacular!)
1 ½ teaspoons cornstarch
1 tablesoon brown cane sugar crystals (more if you’re using unsweetened peaches.  Add sugar to taste)


1 cup unprocessed oatmeal
2/3 cup coconut milk powder
3 tablesoons brown cane sugar crystals
½ cup sliced almonds, skin on
½ teaspoon coarse sea salt
5 green cardamom pods, husked and finely ground
1/3 cup butter


 Arrange peaches in a pretty baking pan.  Sprinkle the cornstarch and sugar over them, and stir gently to mix into the liquid from the cut peaches. 
 In a separate bowl, mix all of the above ingredients, but leave the butter on top.  Microwave for a minute or so, till the butter has melted.  Stir well, and spoon the crumble evenly over the peaches.

Bake one hour at 350 F.
Served with a bit of icecream, this recipe for cardamom bliss peach crumble will float you around the room and up to heaven.  When you’ve come back to earth, you can congratulate yourself for having a low gluten healthy,  vitamin filled dessert!
I selected this post to be featured on indian food blogs. Please visit the site and vote for my blog!

Tuesday, 31 January 2012

Ridiculously Easy Mango Lassi


A Ridiculously Easy Mango Lassi

My daughter, Amie, warned me that in Pushkar I was not to order a bang lassi.  When we arrived in Pushkar, I saw that the restaurant had no ‘bang’ lassi on the menu, but they did have a ‘special’ lassi.  When we asked what was in it, the waiter had a giggling fit, and said “merr-ha-whanna”.
This sublime mango lassi is ridiculously easy to make!
This recipe is for a sublime and healthy mango lassi, although other fruits are delicious as well.  I frequently use frozen raspberries, blueberries, cherries or bananas.  I can’t imagine using merr-ha-whanna, because I think it would taste vile.  On the other hand, I have been known to toss in a tablespoon of hemp seed, which has no THC content, but is rich in omega-3 fats.  It will also keep you feeling full longer.  It's up to you.
1 cup plain yogurt  (home made or store bought
1 cup frozen mango chunks (or a combination of the above mentioned fruits)
1 tablespoon sugar
¼ teaspoon rose water
2 green cardamom pods, husks removed and finely ground in a mortar and pestle. 

Put the yogurt into a blender.  Then add the remainder of the ingredients.  Liquify . 

Pour into a charming glass, and have this for a light breakfast, lunch or snack.  It is absolutely sublime…

Tip:  When having guests for dinner, Set out a small jug of mango lassi with elegant liqueur glasses, so if the vindaloo is burning someone alive, they can be rescued with a cool sip of lassi.  They will thank you for it.

How to Make Home Made Yogurt


How to Make Home Made Yogurt!

True, in the eighties, you couldn’t go to a garage sale without tripping over an electric yogurt maker.  Yet, I’ve known  only two people who’ve actually made their own yogurt, and they are the ladies who influenced me to do the same.  The first went up to Canada’s Northwest Territories in the sixties, stars shining in her idealistic eyes.  Living in a big old tent heated with a woodstove, year round no less, she regularly made her yogurt on that very woodstove.  She would sew herself into her long underwear in the fall.  The other lady was originally from San Francisco, but had moved to a country home in North Idaho.  She made fabulous yogurt on her vintage 1950’s gas stove that had a pilot light which perfectly maintained the right yogurt temperature, that is until it blew up a few months ago, nearly taking her home and partner with it.  Ouch!
My recipe for home made yogurt is extremely healthy and can be made in anybody’s kitchen, with little effort and no special equipment.
4 cups 1% milk
1/3 cup skim milk powder
2 tablespoons high quality plain yogurt  (you can use your own, once you’re started, but if you don’t have any ‘starter’ yogurt, buy a serving size carton in the health food store.  Be sure you are buying a ‘pro-biotic’ plain yogurt.)
As early as possible, put your starter yogurt in a draft free spot, to let the little creatures in there throw off their refrigerator chill, and wake up. 
Pour the milk into a non-stick pan, and add the skim milk powder.  Stirring occasionally, heat till tiny bubbles percolate to the surface.  Take off the heat to cool.  Immediately turn your oven on.  The default heat setting is fine, because you will watch it carefully and turn it off the moment it registers above 100 F.  Turn on the oven light to help keep it warm and remind you to take the yogurt out later.  It will take at least 30 minutes, perhaps longer, for your milk to become slightly warmer than lukewarm.  Check it often.  When it feel comfortably warm on your wrist, pour it into the covered container that you’ll keep your yogurt in.  (I use a plastic container.)  Carefully mix in the starter yogurt.  It should be well incorporated into the milk to distribute the creatures. 

Check your oven, it should be warm and cozy, but not hot.  If the rack is hot to the touch, fold an old tea towel and place it on the rack.  Put the container on the tea towel, close the door, and let sit for six hours.  After that time has passed, gently tilt your container to see if the yogurt has solidified.  If it has, remove it and don’t forget the the tea towel!  Cover the container and refrigerate.  You can leave the container in the oven for another two hours, but leaving it in there for more than eight hours can make yogurt that’s a little too tangy!

Plain yogurt is a healthy accompaniment to many savoury dishes, and it’s wonderful with fruit and a little honey.  Better yet, it’s amazing in a fresh lassi!